
Scaling a web application across a multi-node IIS farm requires a reliable way to ensure every server is identical, secure, and updated automatically. While manual configuration is an option for a single server, enterprise environments demand a more sophisticated approach. By using PowerShell Desired State Configuration (DSC), we can treat our server configurations as a code base, ensuring that every node in the farm remains synchronized with a master source of truth.
In this demo, we will build a fully automated IIS web farm from the ground up. We will leverage Infrastructure as Code (IaC) principles to define our server roles and use Group Managed Service Accounts (gMSA) to handle secure, password-less authentication for our content delivery.
Our architecture centers on a central SMB share that serves as the master source for our web content. By the end of this guide, you will have a complete environment where:
- Infrastructure is Code: The entire IIS setup and folder structure are defined in a single, repeatable DSC script.
- Secure Identity: File synchronization is performed using a gMSA, removing the need to manage service account passwords manually.
- Automated Sync: Target nodes automatically pull content from a central SMB share, maintaining a consistent state across the entire farm.
This demo will walk through the creation of the gMSA, the configuration of the SMB share permissions using Domain Groups, and the deployment of the final DSC configuration to our web nodes.
In this demo, we'll use this topology:
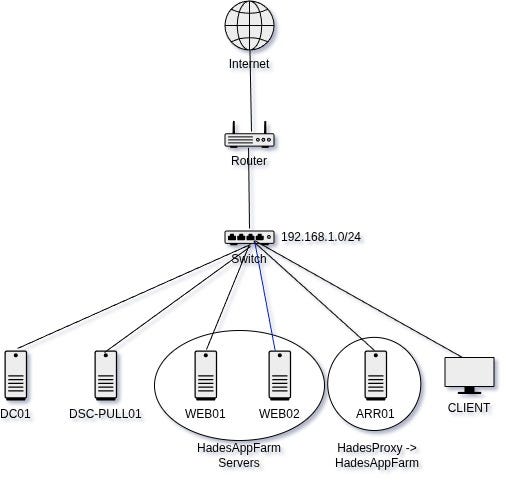
Components and pre-prequisites for this lab are:
- DC01 (Windows Server 2022 Datacenter Core - 192.168.1.101/24) This machine acts as the Active Directory Domain Controller (ADDC) and DNS server for the hades.app domain. All necessary services and configurations are already provisioned.
- DSC-PULL01 (Windows Server 2022 Datacenter Core - 192.168.1.102)
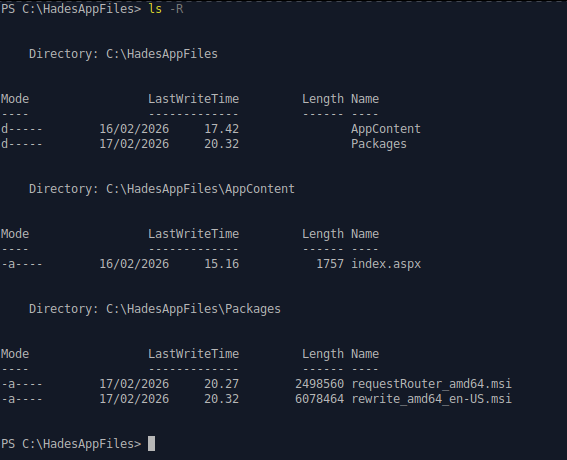
This server will act as the PowerShell DSC (Desired State Configuration) pull server from which WEB01, WEB02, and ARR01 will pull their configurations. This server is already joined to the hades.app domain. The required website index file and IIS extension packages are hosted on this machine and will be shared via SMB at
C:\HadesAppFiles.
- WEB01 & WEB02 (Windows Server 2022 Datacenter Core - 192.168.1.103–104) These servers will act as the target web nodes in the farm. They will pull their configurations from the DSC pull server to ensure consistent IIS settings and web content across both instances. WEB01 is already joined to the hades.app domain and will be configured first. We'll also demonstrate adding a new node (WEB02) to the farm using automated configuration by DSC.
- ARR01 (Windows Server 2022 Datacenter Core - 192.168.1.105) This server will act as the Application Request Routing (ARR) load balancer. It will hosts reverse proxy (HadesProxy) that will be pointed to the web farm (HadesAppFarm). It will pull its configuration to manage and distribute incoming traffic across the WEB01 and WEB02 nodes. This computer is already joined to the hades.app domain.
- CLIENT (DHCP) This computer will be used to test the functionality of the web farm and load balancing via a web browser.
- Additional File: index.aspx This file serves as the default index page for the web application. The webpage displays the hostname of the web server currently handling the request, along with other relevant server details. File Content:
<%@ Page Language="C#" %>
<!DOCTYPE html>
<html lang="en">
<head>
    <meta charset="UTF-8">
    <meta name="viewport" content="width=device-width, initial-scale=1.0">
    <title>Hades Web Farm Status</title>
    <style>
        body {
            background-color: #2c3e50;
            color: white;
            font-family: 'Segoe UI', Tahoma, Geneva, Verdana, sans-serif;
            display: flex;
            justify-content: center;
            align-items: center;
            height: 100vh;
            margin: 0;
        }
        .container {
            border: 2px solid #3498db;
            border-radius: 15px;
            padding: 40px;
            text-align: center;
            background-color: rgba(0, 0, 0, 0.2);
            box-shadow: 0 4px 15px rgba(0,0,0,0.3);
        }
        h1 { color: #3498db; font-size: 3em; margin-bottom: 0.5em; }
        .info { font-size: 1.5em; margin: 15px 0; }
        .highlight { color: #2ecc71; font-weight: bold; }
        hr { border: 0; border-top: 1px solid #7f8c8d; margin: 25px 0; }
    </style>
</head>
<body>
    <div class="container">
        <h1>Web Farm Node Active</h1>

        <div class="info">
            Current Server: <span class="highlight"><%= System.Environment.MachineName %></span>
        </div>

        <div class="info">
            App Pool Identity: <span class="highlight"><%= System.Security.Principal.WindowsIdentity.GetCurrent().Name %></span>
        </div>

        <hr>

        <div class="info" style="font-size: 1.2em; color: #95a5a6;">
            Deployment Status: <span style="color: #2ecc71;">Managed by DSC Pull Server</span>
        </div>
    </div>
</body>
</html>- Additional Packages: IIS Application Request Routing and URL Rewrite Extensions These installation packages are required to install the Application Request Routing (ARR) and URL Rewrite modules for IIS. The packages can be downloaded from the following official sources: - Application Request Routing (ARR): https://www.iis.net/downloads/microsoft/application-request-routing - URL Rewrite Module: https://www.iis.net/downloads/microsoft/url-rewrite
- Additional: SSL Certificate for DSC Pull Server
It is considered a best practice for the DSC Pull Server to use SSL (HTTPS). For this lab environment, an SSL certificate for the DSC Pull Server has already been created and imported on
DSC-PULL01. In addition, the Root CA certificate has been imported and trusted by all machines participating in this lab environment. The SSL certificate is also configured to use DNS and IP address ofDSC-PULL01as Subject Alternative Names (SANs)
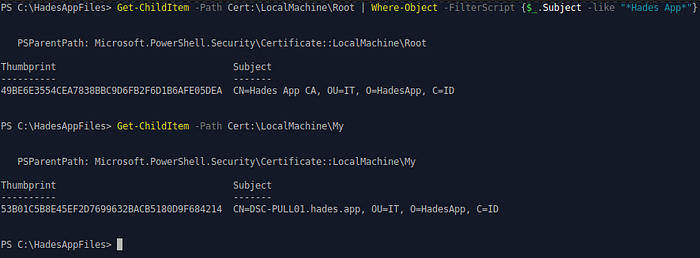
DSC-PULL01, and the Root CA certificate is trusted by all machines in the environment.Assuming that all required components and prerequisites are already in place, we can proceed with the configuration steps.
A. Create an Active Directory Security Global Group,Group Managed Service Account (gMSA), and DNS Record for Web Proxy
In this phase, create a new Active Directory Security Global Group that will contain all web servers in the web farm. A Group Managed Service Account (gMSA) will be used as the service account to run the website on each web server, and the security group will be granted permission to install and use this gMSA. The group also acts as a security control — only hosts that are members of this group can run the website, even if they retrieve the web server configuration from DSC-PULL01. Additionally, create a DNS record for the web proxy endpoint (for example, a hostname that points to your ARR or load balancer). This DNS name will be used by clients to access the web application through the proxy layer.
- Create a new Security Global Group named
Web-Servers
New-ADGroup Web-Servers -GroupScope Global -GroupCategory Security- Add
WEB01to the newly created group. SinceWEB02has not yet been joined to the domain, it will be added at a later phase
Add-ADGroupMember -Identity Web-Servers -Members WEB01$- Create a new Key Distribution Service (KDS) key and configure it to become effective immediately. By default, a KDS key becomes effective 10 hours after creation. Therefore, the effective time must be adjusted to bypass this delay. This step is required to enable the creation of the Group Managed Service Account (gMSA).
Add-KdsRootKey -EffectiveTime ((get-date).addhours(-10))- Create a new Group Managed Service Account (gMSA) named
web-gmsa, and grant password retrieval permission to theWeb-Serverssecurity group. The DNSHostName parameter is required to generate the associated Service Principal Name (SPN). This DNS host name does not need to exist as an actual DNS record. Specify it using the following format:<gmsa_name>.<domain>.<tld>
New-ADServiceAccount -Name web-gmsa -DNSHostName web-gmsa.hades.app -PrincipalsAllowedToRetrieveManagedPassword Web-Servers- Add a new DNS record for the web proxy. Since DNS record for
ARR01is created automatically while it joining the domain, we can create a new CNAME record pointing to it. Here, we'll usewww.hades.appfor the web proxy
Add-DnsServerResourceRecord -ZoneName hades.app -Name www -CName -HostNameAlias ARR01B. Configure the SMB Share and DSC Pull Server on DSC-PULL01
Configure an SMB share to host all required files for the web farm servers, and set up a DSC Pull Server on DSC-PULL01 to host and distribute the DSC configurations.
- Create a new SMB share named
HadesAppFilesthat points toC:\HadesAppFiles. Grant read access to theHADES\Web-Serversgroup and theHADES\ARR01$computer account, allowing both to retrieve the required website files and IIS extension packages from this share
# Create and grant permissions
New-SmbShare -Path C:\HadesAppFiles -ReadAccess HADES\Web-Servers -Name HadesAppFiles
Grant-SmbShareAccess -Name HadesAppFiles -AccountName HADES\ARR01$ -AccessRight Read

# Verify
Get-SmbShare -Name HadesAppFiles
Get-SmbShareAccess -Name HadesAppFiles- To set up the DSC Pull Service, first install the NuGet package provider and mark the PSGallery repository as trusted. All required modules will be installed from this repository
Install-PackageProvider -Name NuGet -MinimumVersion 2.8.5.201 -Force
Set-PSRepository -Name 'PSGallery' -InstallationPolicy Trusted- After that, install
xPSDesiredStateConfigurationmodule
Install-Module xPSDesiredStateConfiguration- Generate a new GUID to be used as the registration key for the DSC Pull Server. Client nodes must use this key to register with the DSC Pull Server and retrieve their configurations. Note the value returned by this command and use it in the next step
New-Guid- Create a new directory to store all DSC configuration artifacts. Within this directory, create a new DSC configuration script that will configure
DSC-PULL01to host the DSC Pull Server
New-Item -Type Directory -Path C:\DSC
cd C:\DSC
notepad.exe DSCPullServerSetup.ps1
Content of DSCPullServerSetup.ps1:
Configuration DSCPullServerSetup
{
    Import-DscResource -ModuleName PSDesiredStateConfiguration
    Import-DscResource -ModuleName xPSDesiredStateConfiguration

    Node "DSC-PULL01"
    {
        WindowsFeature DSCServiceFeature
        {
            Ensure = "Present"
            Name   = "DSC-Service"
        }

        File RegistrationKeyFile
        {
            Ensure          = 'Present'
            Type            = 'File'
            DestinationPath = "$env:ProgramFiles\WindowsPowerShell\DscService\RegistrationKeys.txt"
            Contents        = "ad9ddd35-817e-4c67-90d4-9c998558a8d8"
        }

        xDscWebService PSDSCPullServer
        {
            Ensure                   = "Present"
            EndpointName             = "PSDSCPullServer"
            Port                     = 8080
            PhysicalPath             = "$env:SystemDrive\inetpub\PSDSCPullServer"
            ModulePath               = "$env:PROGRAMFILES\WindowsPowerShell\DscService\Modules"
            ConfigurationPath        = "$env:PROGRAMFILES\WindowsPowerShell\DscService\Configuration"
            State                    = "Started"
            DependsOn                = "[WindowsFeature]DSCServiceFeature", "[File]RegistrationKeyFile"
            RegistrationKeyPath      = "$env:PROGRAMFILES\WindowsPowerShell\DscService"
            UseSecurityBestPractices = $true
            CertificateThumbprint    = "$((Get-ChildItem Cert:\LocalMachine\My | Where-Object { $_.Subject -like "*DSC-PULL01.hades.app*" }).Thumbprint)"
            Enable32BitAppOnWin64    = $false
            AcceptSelfSignedCertificates = $true
        }

    }
}
Note: In the File RegistrationKeyFile section, set the Contents value to the GUID generated in the previous step using New-Guid. Adjust the configuration values - such as the CertificateThumbprint and filter setting - to match your environment. Make sure the Node value match your DSC Pull Server's hostname. This configuration sets up the DSC Pull Server to use HTTPS on port 8080.
- Run the script ,compile the configuration, then apply the DSC configuration (still in
C:\DSCdirectory)
. .\DSCPullServerSetup.ps1
DSCPullServerSetup
Start-DscConfiguration -Path .\DSCPullServerSetup -Wait -Verbose -Force- Make sure that there is no error while applying the DSC configuration. Verify the status of DSC Pull Server
Get-WebSite -Name PSDSCPullServer
Get-WebAppPoolState -Name PSWS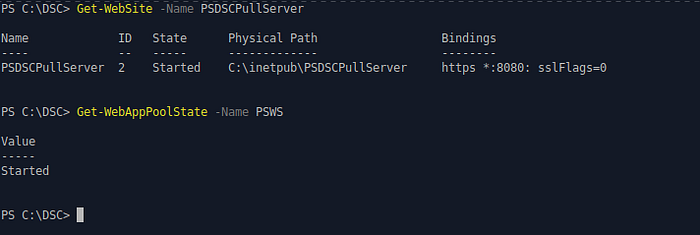
The environment is now ready to host DSC configurations on DSC-PULL01, allowing web farm servers to pull their configurations from the Pull Server.
C. Host Web Server DSC Configuration and Apply It to WEB01
In this phase, the DSC configuration for the web servers in the web farm will be hosted on the Pull Server. WEB01 will register with the Pull Server, retrieve the configuration, and apply it locally. First, apply these configurations in DSC-PULL01:
- Retrieve the DSC Pull Server registration key, which is the GUID generated in the previous phase. If it has been forgotten, it can be retrieved from the
RegistrationKeys.txtfile on the Pull Server. Note this value as it'll be used in the web servers to register themself with DSC Pull Server
Get-Content "$env:ProgramFiles\WindowsPowerShell\DscService\RegistrationKeys.txt"- Install the WebAdministrationDsc module, as it will be required by the DSC configuration for the web servers. After installation, package and publish this module to the DSC Pull Server so that web servers can automatically retrieve it, eliminating the need for manual installation on each node
# Install the latest stable version of the WebAdministrationDsc module from PSGallery
Install-Module -Name WebAdministrationDsc

# Prepare the module for DSC Pull Server distribution
$ModuleName = "WebAdministrationDsc"
$ModuleStore = "$env:PROGRAMFILES\WindowsPowerShell\DscService\Modules"
Save-Module -Name $ModuleName -Path $ModuleStore -Force

# Package the module for Pull Server use:
# 1. Determine the installed module version
# 2. Create a ZIP archive of the module contents (zip the contents, not the root folder)
# 3. Generate a checksum file so DSC clients can validate and download the module
$Version = (Get-Module -ListAvailable $ModuleName | Select-Object -First 1).Version
$ZipPath = Join-Path $ModuleStore "$($ModuleName)_$($Version).zip"
Compress-Archive -Path "$ModuleStore\$ModuleName\$Version\*" -DestinationPath $ZipPath -Force
New-DSCCheckSum -Path $ZipPath -Force- Navigate to the DSC configuration directory, and then create a new DSC configuration script for the web server configuration
cd C:\DSC
notepad.exe HadesAppRole.ps1
Content of HadesWebApp.ps1:
$ConfigData = @{
    AllNodes = @(
        @{
            NodeName                    = "localhost"
            PSDscAllowPlainTextPassword = $true   # Allow plaintext password for lab/testing scenarios
            PSDscAllowDomainUser        = $true   # Allow domain account usage in DSC configuration
        }
    )
}

Configuration HadesAppRole {
    # Import required DSC resources
    Import-DscResource -ModuleName PSDesiredStateConfiguration
    Import-DscResource -ModuleName WebAdministrationDsc

    Node $AllNodes.NodeName {

        # Define gMSA credential (password is required syntactically but ignored by AD for gMSA)
        $gMSACredential = [PSCredential]::new("HADES\web-gmsa$", (ConvertTo-SecureString "ThisWillBeIgnored" -AsPlainText -Force))

        # Install required Windows features: AD PowerShell tools and IIS Web Server
        WindowsFeature ADPowerShell {
            Ensure = "Present"
            Name = "RSAT-AD-PowerShell"
        }
        WindowsFeature IIS {
            Ensure = "Present"
            Name = "Web-Server"
        }

        # Enable ASP.NET 4.5 support required for index.aspx
        WindowsFeature NetFramework45 {
            Ensure = "Present"
            Name   = "NET-Framework-45-ASPNET"
        }

        # Enable ASP.NET 4.x role services in IIS
        WindowsFeature AspNet45 {
            Ensure = "Present"
            Name   = "Web-Asp-Net45"
        }

        # Install and verify the gMSA account on the node
        Script InstallGMSA {
            SetScript  = { Import-Module ActiveDirectory; Install-ADServiceAccount -Identity "web-gmsa" }
            TestScript = {
                Import-Module ActiveDirectory
                (Get-ADServiceAccount -Identity "web-gmsa" -ErrorAction SilentlyContinue) -ne $null
            }
            GetScript  = { return @{ Result = "gMSA Status" } }
            DependsOn  = "[WindowsFeature]ADPowerShell"
        }

        # Copy website content from SMB share to IIS web root
        File WebContent {
            Ensure          = "Present"
            Type            = "Directory"
            Recurse         = $true
            SourcePath      =  "\\DSC-PULL01\HadesAppFiles\AppContent"
            DestinationPath = "C:\inetpub\wwwroot\HadesApp"
            DependsOn       = "[WindowsFeature]IIS"
        }

        # Create and start IIS application pool using gMSA identity
        WebAppPool HadesAppPool {
            Name                      = "HadesAppPool"
            Ensure                    = "Present"
            IdentityType              = "SpecificUser"
            Credential                = $gMSACredential
            DependsOn                 = "[Script]InstallGMSA"
            State                     = "Started"
        }

        # Stop default IIS website to free port 80
        Website DefaultWebSite {
                Ensure       = "Present"
                Name         = "Default Web Site"
                State        = "Stopped"
        }

        # Create and start the HadesApp website
        Website HadesApp {
            Name            = "HadesApp"
            Ensure          = "Present"
            PhysicalPath    = "C:\inetpub\wwwroot\HadesApp"
            BindingInfo     = @(
                DSC_WebBindingInformation {
                        Port     = 80
                        Protocol = "HTTP"
                }
            )
            ApplicationPool = "HadesAppPool"
            DefaultPage     = "index.aspx"
            State           = "Started"
            DependsOn       = @("[WebAppPool]HadesAppPool", "[File]WebContent")
        }
    }
}
This DSC configuration sets up a web server node for the web farm. When applied, it installs the required Windows features, configures IIS, deploys the website content, and runs the site using a Group Managed Service Account (gMSA). It installs IIS and ASP.NET 4.5, installs and verifies the gMSA on the server, copies the web files from the SMB share, creates an IIS application pool using the gMSA, stops the default IIS site, and creates and starts the HadesApp website. This ensures each node is configured consistently as a working web server. Before applying the configuration, adjust environment-specific values to match your setup.
- Run the script, compile the configuration, then move the compiled configuration to the DSC Pull Server publish directory to host it. Generate the checksum file, as clients use it to detect changes and will only pull the configuration when the checksum is different
. .\HadesAppRole.ps1
HadesAppRole -ConfigurationData $ConfigData -OutputPath "C:\DSC\HadesAppRole"
Move-Item "C:\DSC\HadesAppRole\localhost.mof" "$env:PROGRAMFILES\WindowsPowerShell\DscService\Configuration\HadesAppRole.mof" -Force
New-DSCCheckSum -Path "$env:PROGRAMFILES\WindowsPowerShell\DscService\Configuration\HadesAppRole.mof" -Force
After hosting the DSC configuration for the web servers, configure WEB01 to pull the configuration from the Pull Server and apply it periodically. Perform the following steps on WEB01:
- Run this command to clear the Kerberos ticket cache for the Local System account so the server can obtain a new ticket that includes its updated Active Directory group membership. This ensures the server can immediately access resources that depend on that membership
klist -li 0x3e7 purge- Create a new directory to store DSC artifacts. Then, create a DSC configuration script that configures the local machine to pull the web server configuration from
DSC-PULL01
New-Item -Type Directory -Path C:\DSC
cd C:\DSC
notepad.exe HadesWebNode.ps1
Content of HadesWebNode.ps1:
[DscLocalConfigurationManager()]
Configuration HadesWebNode {
    Node localhost {

        # LCM settings: configure Pull mode, auto-correction, and refresh intervals
        Settings {
            RefreshMode = 'Pull'
            ConfigurationMode = 'ApplyAndAutoCorrect'
            AllowModuleOverwrite = $true

            # How often to check the Pull Server for NEW config (min is 15)
            RefreshFrequencyMins = 30

            # How often to fix "drift" locally (min is 15 and must be a multiple of Refresh)
            ConfigurationModeFrequencyMins = 60
        }

        # Pull Server configuration: defines where to retrieve DSC configurations
        ConfigurationRepositoryWeb DSCPull {
            ServerURL = 'https://DSC-PULL01:8080/PSDSCPullServer.svc'
            RegistrationKey = 'ad9ddd35-817e-4c67-90d4-9c998558a8d8'
            ConfigurationNames = @('HadesAppRole')
        }

        # Reporting configuration: send compliance and status reports back to Pull Server
        ReportServerWeb DSCReport {
            ServerURL = 'https://DSC-PULL01:8080/PSDSCPullServer.svc'
            RegistrationKey = 'ad9ddd35-817e-4c67-90d4-9c998558a8d8'
        }
    }
}
This configuration sets the Local Configuration Manager (LCM) on the node to use Pull mode so it can automatically retrieve and apply its assigned DSC configuration from the Pull Server, periodically check for updates, correct any configuration drift, and report its status back to the server. Before using it, update environment-specific values such as the Pull Server URL, configuration name, and other related settings, and make sure to use the registration key that was retrieved in the previous step so the node can register with the DSC Pull Server.
- Run the script, compile the configuration, then configure the Local Configuration Manager (LCM) to use it. After that, trigger the LCM to pull and apply the web server DSC configuration from
DSC-PULL01
. .\HadesWebNode.ps1
HadesWebNode
Set-DscLocalConfigurationManager -Path C:\DSC\HadesWebNode -Verbose -Force
Update-DscConfiguration -Wait -Verbose- Make sure there is no error message shown while pulling and applying the configuration. Verify the DSC configuration status
Get-DscConfigurationStatus
Test-DscConfiguration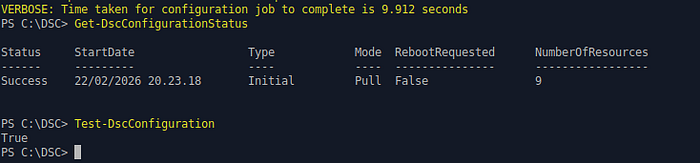
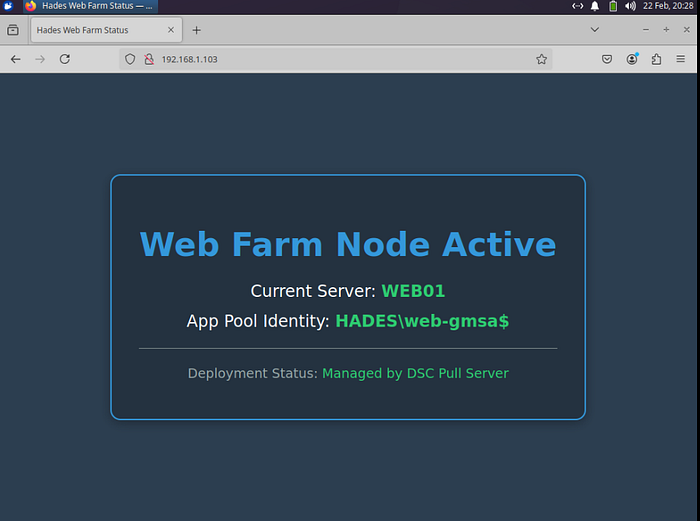
- In client side, we can test it using web browser by visiting
http://<WEB01_ip_address_or_FQDN>
D. Host Web Farm and Proxy DSC Configurations and Apply It to ARR01
In this phase, the DSC configuration for the web farm and proxy will be hosted on the Pull Server. ARR01 will register with the Pull Server, retrieve the configuration, and apply it locally. First, apply these configurations in DSC-PULL01:
- Retrieve the DSC Pull Server registration key, which is the GUID generated in the previous phase. If it has been forgotten, it can be retrieved from the
RegistrationKeys.txtfile on the Pull Server. Note this value as it'll be used in the web servers to register themself with DSC Pull Server
Get-Content "$env:ProgramFiles\WindowsPowerShell\DscService\RegistrationKeys.txt"- We've already hosted
WebAdministrationDscmodule in DSC Pull Server. Using the same module, we'll create DSC configuration forARR01. Navigate to the DSC configuration directory, and then create a new DSC configuration script for the web farm and proxy configuration
cd C:\DSC
notepad.exe HadesARRRole.ps1
Content of HadesARRRole.ps1:
Configuration HadesARRRole {

    Import-DscResource -ModuleName PSDesiredStateConfiguration
    Import-DscResource -ModuleName WebAdministrationDsc

    Node "ARR01" {

        # Ensure IIS is Installed
        WindowsFeature IIS { Name = "Web-Server"; Ensure = "Present" }

        # Ensure AD PowerShell module is present for discovery
        WindowsFeature RSATADPowerShell { Name = "RSAT-AD-PowerShell"; Ensure = "Present" }

        # Install rewrite and AAR IIS extensions
        Package URLRewrite {
            Name      = "IIS URL Rewrite Module 2"
            Path      = "\\DSC-PULL01\HadesAppFiles\Packages\rewrite_amd64_en-US.msi"
            ProductId = "9BCA2118-F753-4A1E-BCF3-5A820729965C"
            Ensure    = "Present"
            DependsOn = "[WindowsFeature]IIS"
        }

        Package ARR {
            Name      = "Microsoft Application Request Routing 3.0"
            Path      = "\\DSC-PULL01\HadesAppFiles\Packages\requestRouter_amd64.msi"
            ProductId = "3C876E4D-B486-49FA-AB33-D94367357A69"
            Ensure    = "Present"
            DependsOn = "[Package]URLRewrite"
        }

        # Release Port 80 by disabling default IIS website
        Website DefaultWebSite {
            Name      = "Default Web Site"
            Ensure    = "Present"
            State     = "Stopped"
        }

        # Farm Population via AD Group Discovery (Web-Servers group member)
        Script ConfigureARR {
            DependsOn = @("[Package]ARR", "[WindowsFeature]RSATADPowerShell")
            SetScript = {
                Import-Module WebAdministration
                Import-Module ActiveDirectory

                # Enable Proxy globally
                Set-WebConfigurationProperty -pspath 'MACHINE/WEBROOT/APPHOST' -filter "system.webServer/proxy" -name "enabled" -value "True"

                # Ensure Farm exists shell
                if (!(Get-WebConfiguration "//webFarms/webFarm[@name='HadesAppFarm']" -ErrorAction SilentlyContinue)) {
                    Add-WebConfiguration -pspath 'MACHINE/WEBROOT/APPHOST' -filter "webFarms" -value @{name='HadesAppFarm'}
                }

                # Enable and configure session persistence. Enable session cookie, set cookie name and session affinity timeout
                Set-WebConfigurationProperty -Filter "webFarms/webFarm[@name='HadesAppFarm']/applicationRequestRouting" -Name "affinity" -Value @{enabled="true"; useCookie="true"; cookieName="SessionCookie"; timeout="01:00:00"}

                # Configure load balancing to use LeastRequests algorithm
                Set-WebConfigurationProperty -Filter "webFarms/webFarm[@name='HadesAppFarm']/applicationRequestRouting" -Name "loadBalancing.algorithm" -Value "LeastRequests"

                # Sync HadesAppFarm servers with AD Group "Web-Servers" (add new, remove stale)
                $ADServers = Get-ADGroupMember -Identity "Web-Servers" |
                             Where-Object { $_.objectClass -eq 'computer' } |
                             ForEach-Object { $_.Name }

                $farmPath = "webFarms/webFarm[@name='HadesAppFarm']"
                $searchPath = "webFarms/webFarm[@name='HadesAppFarm']/server"
                $farmServers = @(Get-WebConfigurationProperty -Filter $searchPath -Name "address" | Select-Object -ExpandProperty Value)

                foreach ($srv in $ADServers) {
                        if ($srv -notin $farmServers) {
                                Add-WebConfiguration -pspath 'MACHINE/WEBROOT/APPHOST' -filter $farmPath -value @{address=$srv}
                        }
                }

                foreach ($farmSrv in $farmServers) {
                        if ($farmSrv -notin $ADServers) {
                                Clear-WebConfiguration -Filter "webFarms/webFarm[@name='HadesAppFarm']/server[@address='$farmSrv']"
                        }
                }

                # Set Health Check
                Set-WebConfigurationProperty -pspath 'MACHINE/WEBROOT/APPHOST' -filter "webFarms/webFarm[@name='HadesAppFarm']/applicationRequestRouting/healthCheck" -name "url" -value "http://HadesAppFarm/"
            }
            TestScript = {
                Import-Module WebAdministration
                Import-Module ActiveDirectory

                $ADServers = Get-ADGroupMember -Identity "Web-Servers" |
                        Where-Object { $_.objectClass -eq 'computer' } |
                        ForEach-Object { $_.Name }

                $farmServers = @(Get-WebConfigurationProperty -Filter "//webFarms/webFarm[@name='HadesAppFarm']/server" -Name "address" |
                        Select-Object -ExpandProperty Value)

                # Fail if any AD server is missing from the farm
                foreach ($srv in $ADServers) {
                        if ($srv -notin $farmServers) { return $false }
                }

                # Fail if any farm server is no longer in AD group (stale)
                foreach ($farmSrv in $farmServers) {
                        if ($farmSrv -notin $ADServers) { return $false }
                }

                return $true
            }
            GetScript = { @{ Result = "Farm Populated with AD Nodes" } }
        }

        # Proxy Site with Auto-Start
        Script CreateProxySite {
            DependsOn = @("[Script]ConfigureARR", "[Website]DefaultWebSite")
            SetScript = {
                Import-Module WebAdministration

                $siteName = "HadesAppProxy"
                $hostName = "www.hades.app"

                # Ensure Site exists with the correct Hostname Binding to www.hades.app
                if (!(Get-Website -Name $siteName -ErrorAction SilentlyContinue)) {
                    New-Website -Name $siteName -Port 80 -PhysicalPath "C:\inetpub\wwwroot" -HostHeader $hostName
                } else {
                    # Update existing binding if it's missing the hostname
                    $binding = Get-WebBinding -Name $siteName -Port 80 -Protocol "http"
                    if ($binding.bindingInformation -notmatch $hostName) {
                        Set-WebBinding -Name $siteName -BindingInformation "*:80:" -PropertyName "bindingInformation" -Value "*:80:$hostName"
                    }
                }

                # Force Start
                Start-Website -Name $siteName

                # Apply Site-Level Rewrite Rule with Host Condition
                $sitePath = "MACHINE/WEBROOT/APPHOST/$siteName"
                $ruleName = "ARR_HadesAppFarm_Rule"

                # Check if rule exists
                $rules = Get-WebConfigurationProperty -pspath $sitePath -filter "system.webServer/rewrite/rules" -name "collection"
                if (!($rules | Where-Object { $_.name -eq $ruleName })) {
                        # Create rule and match all URLs
                                Add-WebConfigurationProperty -pspath $sitePath -filter "system.webServer/rewrite/rules" -name "." -value @{name=$ruleName; patternSyntax="ECMAScript"; stopProcessing="True"}
                                Set-WebConfigurationProperty -pspath $sitePath -filter "system.webServer/rewrite/rules/rule[@name='$ruleName']/match" -name "url" -value ".*"
                                Set-WebConfigurationProperty -pspath $sitePath -filter "system.webServer/rewrite/rules/rule[@name='$ruleName']/action" -name "type" -value "Rewrite"
                                Set-WebConfigurationProperty -pspath $sitePath -filter "system.webServer/rewrite/rules/rule[@name='$ruleName']/action" -name "url" -value "http://HadesAppFarm/{R:0}"
                }

                # Ensure the rule only triggers for www.hades.app (Condition)
                $condPath = "system.webServer/rewrite/rules/rule[@name='$ruleName']/conditions"
                $conditions = Get-WebConfigurationProperty -pspath $sitePath -filter $condPath -name "collection"
                if (!($conditions | Where-Object { $_.input -eq "{HTTP_HOST}" -and $_.pattern -eq "^$hostName$" })) {
                        Add-WebConfigurationProperty -pspath $sitePath -filter $condPath -name "." -value @{input="{HTTP_HOST}"; pattern="^$hostName$"}
                }
            }
            TestScript = {
                Import-Module WebAdministration
                $site = Get-Website -Name "HadesAppProxy" -ErrorAction SilentlyContinue
                $binding = Get-WebBinding -Name "HadesAppProxy" -HostHeader "www.hades.app"

                # Return true only if site is started AND binding is correct
                return ($null -ne $site -and $site.State -eq "Started" -and $null -ne $binding)
            }
            GetScript = { @{ Result = "HadesAppProxy Configured for www.hades.app" } }
        }
    }
}
This DSC configuration sets up ARR01 as an Application Request Routing (ARR) server for the web farm. It installs IIS and the required AD PowerShell module, deploys the IIS extensions for URL Rewrite and ARR, disables the default IIS website to free port 80, and configures the ARR farm by discovering web servers from the Active Directory group Web-Servers. It also enables session persistence, sets load balancing to the LeastRequests algorithm, and configures health checks for the farm.
The configuration then creates a proxy website named HadesAppProxy with a hostname binding (www.hades.app), ensures it is started, and applies a rewrite rule to forward requests to the web farm. Before applying this configuration, adjust environment-specific values such as the AD group name, SMB paths to the MSI packages, the farm name, hostnames, and other related settings to match your environment.
- Run the script, compile the configuration, then move the compiled configuration to the DSC Pull Server publish directory to host it. Generate the checksum file, as clients use it to detect changes and will only pull the configuration when the checksum is different
. .\HadesARRRole.ps1
HadesARRRole
Move-Item "C:\DSC\HadesARRRole\ARR01.mof" "$env:PROGRAMFILES\WindowsPowerShell\DscService\Configuration\HadesARRRole.mof" -Force
New-DSCCheckSum -Path "$env:PROGRAMFILES\WindowsPowerShell\DscService\Configuration\HadesARRRole.mof" -Force
After hosting the DSC configuration for the web farm and proxy, configure ARR01 to pull the configuration from the Pull Server and apply it periodically. Perform the following steps on ARR01:
- Create a new directory to store DSC artifacts. Then, create a DSC configuration script that configures the local machine to pull the web server configuration from
DSC-PULL01
New-Item -Type Directory -Path C:\DSC
cd C:\DSC
notepad.exe HadesARRNode.ps1
Content of HadesARRNode.ps1:
[DscLocalConfigurationManager()]
Configuration HadesARRNode {
    Node ARR01 {
        Settings {
            RefreshMode = 'Pull'
            ConfigurationMode = 'ApplyAndAutoCorrect'
            AllowModuleOverwrite = $true

            # How often to check the Pull Server for NEW config (min is 15)
            RefreshFrequencyMins = 30

            # How often to fix "drift" locally (min is 15 and must be a multiple of Refresh)
            ConfigurationModeFrequencyMins = 60
        }

        # Pull Server configuration: defines where to retrieve DSC configurations
        ConfigurationRepositoryWeb DSCPull {
            ServerURL = 'https://DSC-PULL01:8080/PSDSCPullServer.svc'
            RegistrationKey = 'ad9ddd35-817e-4c67-90d4-9c998558a8d8'
            ConfigurationNames = @('HadesARRRole')
        }

        # Reporting configuration: send compliance and status reports back to Pull Server
        ReportServerWeb DSCReport {
            ServerURL = 'https://DSC-PULL01:8080/PSDSCPullServer.svc'
            RegistrationKey = 'ad9ddd35-817e-4c67-90d4-9c998558a8d8'
        }
    }
}
This configuration sets the Local Configuration Manager (LCM) on the node to use Pull mode so it can automatically retrieve and apply its assigned DSC configuration from the Pull Server, periodically check for updates, correct any configuration drift, and report its status back to the server. Before using it, update environment-specific values such as the Pull Server URL, configuration name, and other related settings, and make sure to use the registration key that was retrieved in the previous step so the node can register with the DSC Pull Server.
- Run the script, compile the configuration, then configure the Local Configuration Manager (LCM) to use it. After that, trigger the LCM to pull and apply the web server DSC configuration from
DSC-PULL01
. .\HadesARRNode.ps1
HadesARRNode
Set-DscLocalConfigurationManager -Path C:\DSC\HadesARRNode -Verbose -Force
Update-DscConfiguration -Wait -Verbose- Make sure there is no error message shown while pulling and applying the configuration. Verify the DSC configuration status
Get-DscConfigurationStatus
Test-DscConfiguration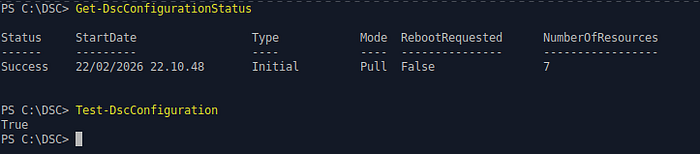
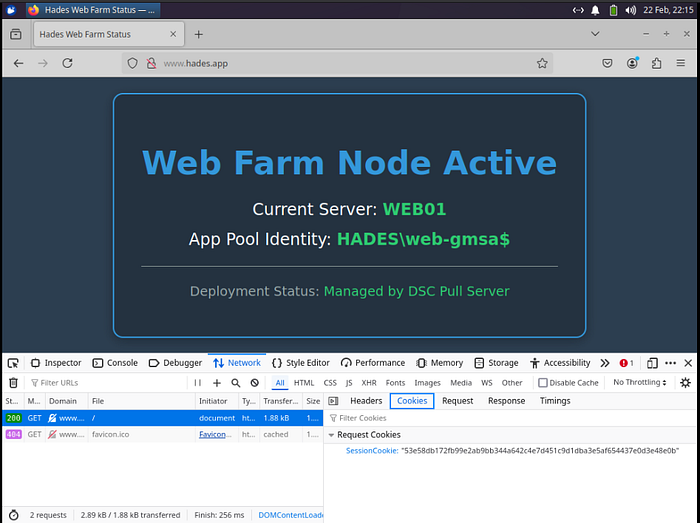
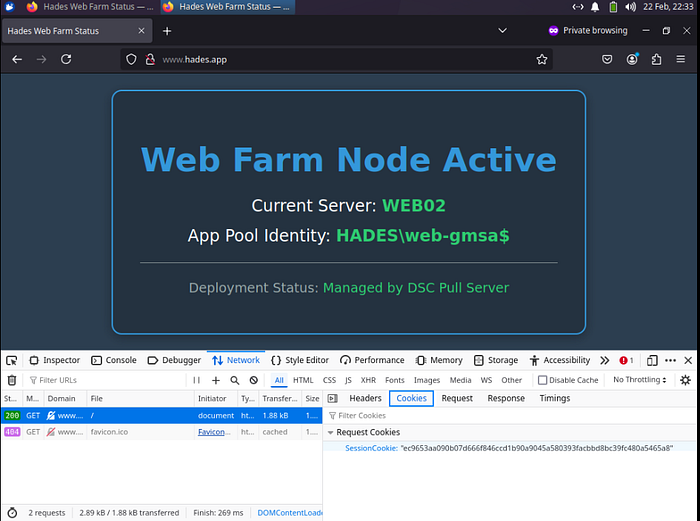
- To verify from client side, we can use web browser and open
http://www.hades.app. Make sure that client's DNS server is pointing toDC01. Also verify that session persistence is working as expected by looking atsessionCookiein browser
E. Scaling-Out Scenario: Adding WEB02 to the Web Farm
To scale the infrastructure, a new server (WEB02) will be added to the farm using the same configuration as WEB01. Once WEB02 is set to pull its settings from DSC-PULL01, the ARR01 configuration must be updated to include the new server. This update can be applied by waiting for the next automatic refresh or by manually triggering the DSC configuration on ARR01 for immediate integration
- Join
WEB02to the domain and add it toWeb-Serversgroup
Add-ADGroupMember -Identity Web-Servers -Members WEB02$- Go to
WEB02,clear the kerberos ticket cache and configure it to pull DSC configuration for web-servers fromDSC-PULL01
klist -li 0x3e7 purge

New-Item -Type Directory -Path C:\DSC
cd C:\DSC
notepad.exe HadesWebNode.ps1
Content of HadesWebNode.ps1:
[DscLocalConfigurationManager()]
Configuration HadesWebNode {
    Node localhost {

        # LCM settings: configure Pull mode, auto-correction, and refresh intervals
        Settings {
            RefreshMode = 'Pull'
            ConfigurationMode = 'ApplyAndAutoCorrect'
            AllowModuleOverwrite = $true

            # How often to check the Pull Server for NEW config (min is 15)
            RefreshFrequencyMins = 30

            # How often to fix "drift" locally (min is 15 and must be a multiple of Refresh)
            ConfigurationModeFrequencyMins = 60
        }

        # Pull Server configuration: defines where to retrieve DSC configurations
        ConfigurationRepositoryWeb DSCPull {
            ServerURL = 'https://DSC-PULL01:8080/PSDSCPullServer.svc'
            RegistrationKey = 'ad9ddd35-817e-4c67-90d4-9c998558a8d8'
            ConfigurationNames = @('HadesAppRole')
        }

        # Reporting configuration: send compliance and status reports back to Pull Server
        ReportServerWeb DSCReport {
            ServerURL = 'https://DSC-PULL01:8080/PSDSCPullServer.svc'
            RegistrationKey = 'ad9ddd35-817e-4c67-90d4-9c998558a8d8'
        }
    }
}
The content of this file is same with the one in WEB01
- Run the script, compile the configuration, then configure the Local Configuration Manager (LCM) to use it. After that, trigger the LCM to pull and apply the web server DSC configuration from
DSC-PULL01
. .\HadesWebNode.ps1
HadesWebNode
Set-DscLocalConfigurationManager -Path C:\DSC\HadesWebNode -Verbose -Force
Update-DscConfiguration -Wait -Verbose- Make sure there is no error message shown while pulling and applying the configuration. Verify the DSC configuration status
Get-DscConfigurationStatus
Test-DscConfiguration- To add
WEB02to the web farm, we can wait for the next DSC configuration re-evaluation (based on configured interval) or manually re- it by running this command onARR01
Start-DscConfiguration -UseExisting -Force -Wait -Verbose- Verify that web server has been added to the farm
Get-WebConfiguration -Filter "webFarms/webFarm[@name='<Web_Farm_Name']/server" -PSPath "IIS:\"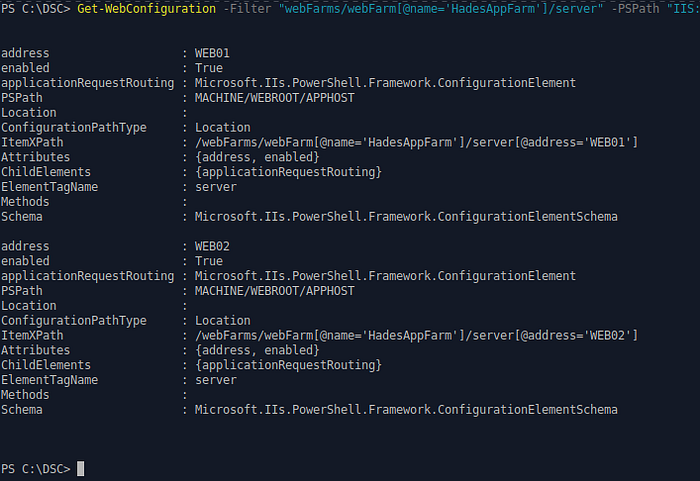
- Verify from client side by using web browser. If you got served by
WEB01, open a new incognito/private browser window and open the web proxy URL
F. Scaling-In Scenario: RemoveWEB02 from the Web Farm
We can simply scale-in the web farm by removing WEB02 from Web-Servers group membership. Then wait for automatic DSC configuration re-evaluation or manually re-evaluate DSC configuration in ARR01
- Remove
WEB02fromWeb-Serversgroup
Remove-ADGroupMember -Identity Web-Servers -Members WEB02$- Wait for next DSC configuration re-evaluation schedule or manually re-evaluate it on
ARR01
Start-DscConfiguration -UseExisting -Force -Wait -Verbose- Verify that
WEB02is no longer exist in the web farm
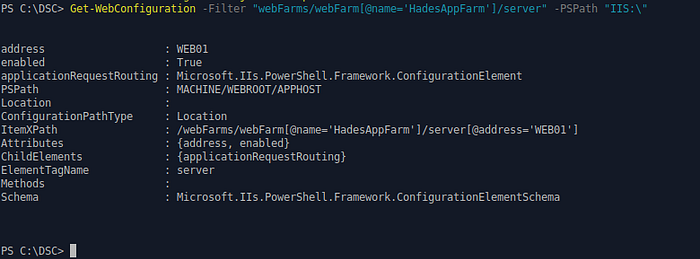
To decommission WEB02, first remove the server from the domain and delete all associated configuration files. By removing WEB02 from the Web-Servers active directory group, you effectively revoke its gMSA permissions; this ensures that even if the server attempts to pull configurations from the DSC Pull Server, it will be unauthorized to host the web application or access protected web files
References:
- https://learn.microsoft.com/en-us/powershell/dsc/pull-server/pullserver?view=dsc-1.1
- https://learn.microsoft.com/en-us/powershell/dsc/quickstarts/website-quickstart?view=dsc-1.1
- https://learn.microsoft.com/en-us/training/modules/implement-desired-state-configuration-dsc/
- https://learn.microsoft.com/en-us/iis/
- https://learn.microsoft.com/en-us/windows-server/identity/ad-ds/manage/group-managed-service-accounts/group-managed-service-accounts/group-managed-service-accounts-overview